Thursday, August 28, 2008

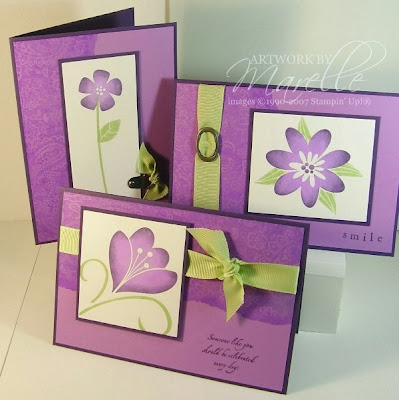
Finally, some cards!

It feels like ages since I actually put a card up here! Those of you who were able to visit the Stitches and Craft Show might find these ones a bit familiar. As I was on the Incentive Trip, I wasn't able to be at the Show, but some of the girls from my team were there, doing a fantastic job. A big thanks to Noreen and Sue, Karen, Kirrily, Lorna, Sam and Robyn for all your hard work!


We demonstrated a fun technique called Faux Tearing, and also showed off the One of a Kind stamp set and matching punch. We had a kit available for purchase at the show, and I'd like to offer the kit to those of you who weren't at the show. One of the best things about these cards is that to make one of these cards you only need 1 inkpad!

Faux Tearing Kit
Background Stamp of your choice
“One of a Kind” Stamp Set
Boho Blossoms Punch
Pack of 12 Sponge Daubers
Double-stitched Ribbon (13.7 metres)
1 Inkpad (colour of your choice)

Total (includes Shipping and Handling) $145 ...SAVE over $10!

PLUS Faux Tearing Instructions and sample card

Just email me if you would like to purchase the kit!

The colours I've used for these cards are Certainly Celery, Wild Wasabi, Pale Plum, Purely Pomegranate, Soft Sky, Blue Bayou, Blush Blossom, and Groovy Guava.


Wednesday, August 27, 2008

Incentive Trip Day 4

Our final day in Palm Cove was a "free" day. We awoke to blue skies (most other days had been warm, but overcast), and decided to go for a walk along the beach. The resort was absolute beachfront, so we didn't have far to go! It was rather windy, so I felt sorry for those who had elected to go on boats. I was quite happy to stay on dry land, having explored the reef just a couple of years ago when we stayed in Cairns for our wedding anniversary.After our walk, we then sat down to a leisurely breakfast (or more like brunch by this time!).
And then back to the Resort for one last spin of the wheel. We got to spin the wheel every day. If it landed on green, you won Stampin' Up! goodies, brown meant a pack of lollies. I was lucky enough to get 4 out of 4 greens, and I took home a pack of Ribbon Originals, Pockets and Pieces, Rub ons, and Rhinestone brads. Cool!
We whiled away the afternoon by the pool, and then I had to get in my robe for a photo shoot! Aaron (the Australian Manager) joined us:
Dinner that night was an amazing experience. We all hopped on a couple of coaches (we found ourselves on the "Party bus"! Nicki and Vicki had organised a karaoke sing-along. I was hoarse by the time we arrived from singing and laughing!). We headed up the mountain to a Wildlife Reserve where we had dinner with the lions. Our dinner tables were set up right next to an enormous Lion's enclosure. They were close enough to touch (but thankfully there was a big fence and an electric current separating us! Seeing a pride of lions running towards you out of the darkness is an amazing experience. Having dinner at the same table as Shelli and Stirling is not to be sneezed at either!
It was a much more tired bunch of people going down the mountain that night, after a tour of the zoo, dinner and yummy dessert.

Sad goodbyes that night, and the next morning, with lots of hugs and promises to see eachother on next year's trip. I'll be there for sure! Who wants to join me? :o)


Incentive Trip Day 3

Day 3 started with a yummy eggs benedict breakfast with Jayne and Joanna, and then we all gathered in a conference room at the Resort for swaps and make-&-take session. Dave and a few other hubbies went to play golf, so they were happy!
Swapping was heaps of fun..I wish I could show you my swap, but I underestimated how many I would need, and gave my "spare" away! Silly me should have at least taken a photo first. All of the swaps I received are gorgeous, and I'll be showing them off at my classes over the next couple of weeks.
This is what we found on the tables for us:
...a Pumpkin Pie bag that has a plastic lining, and inside was 3 inkpads for us to keep and a brand new stamp set called "Ocean Commotion". It was so exciting to get a set that no one else in the world has!! Also on the table was the new Scallop-edge punch that they have in the US, and the news that we will be getting it in our Summer Mini, due out on December 1!
This is how happy I was about that news:

Then we got busy stamping and chatting. This is the table I was at with Sharlene, Rebecca, Karen, Teresa, Karen and Kelly:Afterwards, there was time for a few quick photos. Here's me and Shelli:

And here's the whole group on the steps outside:
The afternoon was spent having a leisurely lunch, and a spa with Sarah, and then the boys came back and we headed out for dinner at a Thai restaurant. Here we are at the restaurant. Julia, Naomi, Jayne, Joanna, me, Liz, Robyn, Robyn, Teresa and Jane. Dave was the token male! (taking the photo)
There was another gift when we got back to our rooms, in a BIG box. Here's a very attractive pic of me (can you tell I like pressies?!):

....containing the most gorgeous, soft bathrobe, embroidered with our initials. ta da!

Day 4, our last day, tomorrow, and then I'll get back to cards, I promise!

Tuesday, August 26, 2008

Incentive Trip Day 2

Thursday - The whole group met for a buffet breakfast in the Resort Restaurant....yummy tropical fruits as well as the usual hot breakfast. Then the coaches arrived to take us to the Railway station so we could catch the train up to Kuranda Village. We were treated to Macadamia nuts, juice and train souvenirs on the way up. Here's a pic of Alisa Tilsner, Sarah Klass and I on the train:
Marelle Taylor Stampin' Up! AustraliaIt was lovely to wander around in Kuranda. Dave and I visited the Butterfly Sanctuary, which was amazing. Butterflies were landing on us all the time. This one was a bit cheekier than most of them!
Marelle Taylor Stampin' Up! AustraliaWe had lunch with the lovely Cheryl Andrews and her hubby Craig, did some shopping, and then headed back down on the Skyrail. We stopped and did a walk through the rainforest on the way. Sarah took this photo of Dave and I on the Skyrail (I may look like I'm smiling but my teeth are actually clenched... I hate heights!)
Marelle Taylor Stampin' Up! AustraliaWe caught the coach back, and then headed back to our rooms to find another pressie - a Workshop Wows DVD of lots of US demos presenting at their Regional training events.
We met up in Alisa's room for drinkies this time, watched some of the wows (while the boys talked man stuff on the balcony), and then headed out for dinner at the local pizza restaurant. We were all set to have coffee with Jayne, Joanna, Alisa and Craig in our room, when Dave realised his key wouldn't fit in our lock. It took a moment to work out why....it was the restaurant's toilet key! And where was our key?? Hanging on the restaurant's toilet key hook, of course! So poor Dave had to go all the way back to the restaurant and swap the keys over. Don't feel too sorry for him... He did come back holding an icecream!

Monday, August 25, 2008

Stampin' Up! Incentive Trip Day 1

I'm back!!
I was lucky enough to be one of the 25 Aussie and Kiwi Demonstrators who earned Stampin' Up!'s Incentive Trip this year. It was an all-expenses paid holiday for two to Palm Cove (north of Cairns). I arrived home late yesterday, and I'm still on a high.
It was lovely to wander around in shorts and t-shirts and defrost my frozen limbs!
I know there are a few of you out there dying to know all about the trip, so I'll be spending the next couple of days filling you in!
Day 1 Wednesday
We packed the kids off to my Mum's on Tuesday night, and the dog off to a good friend and downline, Robyn (Thanks Rob!!), so we could leave for the airport at 7am. The airport was quite a gathering place, as all the flights from New Zealand, Adelaide, Melbourne and the US all met there to go on the one flight to Cairns. Shelli and Stirling were on our flight, as were Aaron and Karen, the Australian Manager and his wife. We were all sooo excited. It was great to see so many people that I hadn't seen since Convention. We were all seated towards the back of the plane, and there was lots of excited chatter all the way. We were met at Cairns airport and had a friendly coach trip up to Cairns, with a few local attractions pointed out along the way. We were met at the Resort with a cool towel and a glass of iced tea, and then shown to our rooms. The rooms were HUGE! Large lounges, full kitchens, 2 bathrooms, a bedroom with another lounge in it, and a balcony. The balconies were very "Melrose Place", all overlooking a central pool area. We could all hang over our balconies and chat to eachother. All our doors had an "Incentive Trip achiever" plaque on them (magnetised, so you could take it home afterwards). This is what the plaque looked like:

Marelle Taylor Stampin' Up! Australia

In our rooms were our shirts for lawn bowling, our group activity later that night. We were "Brilliant Blue". All the teams were Stampin' Up! colours (of course), and I was relieved not to be Yoyo Yellow, my least-favourite colour!
We spent the next couple of hours settling in, and then a few of us gathered for drinkies in our room before heading to the Group Dinner. Dinner was an elaborate BBQ smorgasbord at the Resort's restaurant...absolutely delicious. We sat and chatted with the lovely Ngaire and her hubby, Donald. After dinner we hopped onto a couple of coaches to the Lawn Bowls. Who knew that the oldies who play this game were having so much fun?? Well, probably not as much fun as we all had! We gathered in our teams, and were given our bowls. Here's me bowling (obviously a natural...NOT!):
Marelle Taylor Stampin' Up! AustraliaOur team was Nicki Tidbold and her hubby Dave, and Naomi Swan and her friend Julia. We came up with a very memorable team chant "we're Brilliant, we're Blue, we're better than you!", won nothing and had a blast! The owner of the bowls club thought our Stampin' Up! team names were quite unusual, and dubbed "Bravo Burgundy" "Bravo Bundy"...hilarious! When we got back to our rooms, there was a gift waiting for us. All our pressies were so gorgeously wrapped, it was a shame to open them! Here's me in my sexy bowling shirt (that has now become a pj top!) holding my gift. That's the back of the big lounge I'm sitting on. Inside was the softest white hoodie you can imagine, with the Palm Cove Stampin' Up! logo on it.
Marelle Taylor Stampin' Up! AustraliaWe watched some Olympics before heading to bed. Asleep by 10:30...now that NEVER happens at home!

Monday, August 18, 2008

2 sleeps to go!

There's 2 sleeps until the Craft Show, and 2 sleeps until I fly off to Queensland for the Stampin' Up! Incentive Trip. Getting ready for both of those BIG events means that things have been a little hectic around here!
This card would look familiar to you if you were a guest at one of my workshops during June or July. I thought I'd pop it up here since our make-and-take at the show uses the gorgeous Baroque Motifs set, and it's always helpful to see the same set used in a few different ways!

Marelle Taylor Stampin' Up! Australia
It's so easy to make quick, but elegant cards using this set.
To make this card, stamp the flourish stamp in River Rock ink, and then stamp the small flower several times in Blue Bayou ink without re-inking (this is called the fade-out technique). Tie River Rock Double-Stitched ribbon around your stamped panel, attach to a piece of Blue Bayou card and then attach to your cardfront. The sentiment is simply layers of circle punches: the scallop circle, 1 3/8", 1/1/4"and 3/4" circles. I rock'n'rolled the small flower this time: ink it up in Soft Sky ink, then roll the edges of the stamp in Blue Bayou ink before stamping onto Whisper White cardstock. I popped it up using a Dimensional.

Stamps: Baroque Motifs, Think Happy Thoughts
Ink: River Rock, Soft Sky, Blue Bayou
Cardstock: Soft Sky, Blue Bayou, Whisper White, River Rock
Other: Scallop circle, 1 3/8" circle, 1 1/4" circle, 3/4" circle, Dimensionals

Thursday, August 14, 2008

It's Show Time! (and more Faux Tearing)

It's that time of year again! A group of us are getting together and having a stand at the Stitches and Craft Show. It's THE craft show of the year, so make sure you don't miss it!
I personally won't be there (I fly off on the Stampin' Up! Incentive Trip next week), but some of my team will be there.

The Sydney Stitches and Craft Show has a huge variety of craft works and supplies on display. Look for us the Stampin' Up! stand, and come over and say hello! You can join in our Free Make-and-Take. There will be lots of ideas on display and fantastic demonstrations happening too...Crayon Resist, Faux Tearing, Chalkboard, Stamp Wheels, Scrapbooking and more!
When: Wed 20 -Sun 24 August 2008 (that's next week), 10am - 5pm daily
Where: Rosehill Racecourse, Unwin Street, Rosehill (Sydney) NSW
Entry: $15 adult, $12 concession (aged and student), Children (5-16 years) $7

Here's a sample of Faux Tearing to whet your appetite. You can come and see it being demonstrated at the show:

Marelle Taylor Stampin' Up! AustraliaThese are some cards that I had published in an Aussie magazine "For Keeps Creative Paper" a couple of months ago, and I never got around to showing you them on here. Alisa sent me a card with this colour combination, and inspired me to make more!
Here are the instructions. They are quite detailed as I had to send them into the mag with everything listed!

MATERIALS for all cards
Stamps: Bodacious Bouquet, Paisley, It’s Your Birthday, Simple Sayings II (retired)
Card: Elegant Eggplant, Orchid Opulence and Whisper White.
Ink pads: Elegant Eggplant, Orchid Opulence, Certainly Celery
Embellishments: Celery Wide Grosgrain Ribbon, Pewter Hodgepodge Hardware
Other tools: Paper Trimmer, scissors, sponge daubers, SNAIL adhesive, Stampin’ Dimensionals, Sticky Strip, Scrap paper, Sticky note

Faux Tearing Instructions for all cards:
1. Tear a scrap of paper that is at least as long as your card. This will be your mask.
2. Lay the torn edge along your Orchid Opulence card where you would like your faux tear to be
3. Use sponge daubers to sponge along the torn edge in Orchid Opulence ink.
4. Move the mask up a few mm and stamp Paisley Background stamp in Orchid Opulence ink above the tear

Smile card
Trim a piece of Orchid Opulence Card to 14.3 x 10cm. Create Faux Tear as per above instructions. Attach a piece of Wide Celery Ribbon and Hodgepodge buckle to left hand side of card with Sticky Strip. Adhere to folded Elegant Eggplant A5 card with SNAIL adhesive. Ink Large Bodacious Flower design in Orchid Opulence ink. Use a sponge dauber to ink the edges of the petals in Elegant Eggplant ink. Stamp onto Whisper White cardstock. Stamp large flower again onto a Sticky note. Trim around flower carefully with scissors. Place on top of stamped flower as a mask. Stamp 4 leaves over the top of your mask in Certainly Celery ink. Remove mask. Trim Whisper White cardstock to 7.5 x 6.5cm. Adhere to 8 x 7cm piece of Elegant Eggplant cardstock, and then to base card with SNAIL adhesive. Stamp the word ‘smile’ in Elegant Eggplant ink.

Someone like you card
Trim a piece of Orchid Opulence Card to 14.3 x 10cm. Create Faux Tear as per above instructions. Attach a piece of Wide Celery Ribbon across the front of the card, and adhere to the back with Sticky Strip. Tie a knot separately on top. Adhere to folded Elegant Eggplant A5 card with SNAIL adhesive. Ink Large Bodacious Flower design in Orchid Opulence ink. Use a sponge dauber to ink the edges of the petals in Elegant Eggplant ink. Stamp onto Whisper White cardstock. Stamp swirly stem in Certainly Celery ink. Trim Whisper White cardstock to 6.5 x 7cm. Adhere to 7 x 7.5cm piece of Elegant Eggplant cardstock, and then to base card with Stampin’ Dimensionals. Stamp the sentiment in Elegant Eggplant ink.

Long stem card
Trim a piece of Orchid Opulence Card to 14.3 x 10cm. Create Faux Tear as per above instructions. Adhere to folded Elegant Eggplant A5 card with SNAIL adhesive. Ink small bodacious Flower design in Orchid Opulence ink. Use a sponge dauber to ink the edges of the petals in Elegant Eggplant ink. Stamp onto Whisper White cardstock. Stamp stem in Certainly Celery ink. Stamp leaf in Certainly Celery ink. Trim Whisper White cardstock to 4.5 x 10.5cm. Adhere to 5 x 11cm piece of Elegant Eggplant cardstock. Attach a Hodgepodge ribbon charm and brad to bottom right hand corner. Knot a piece of Celery Wide Grosgrain ribbon to the Hodgepodge. Adhere to base card with SNAIL adhesive.

Monday, August 11, 2008

Faux Metal

This is the last of last month's cards I have to show you, and then I'll need to get cracking and make some new stuff LOL
This is the other "Embossing and More" card - Faux Metal technique:

Marelle Taylor Stampin' Up! AustraliaIt's similar to Cracked Glass, in that you do layers of embossing powder, but in a metallic finish this time, and then while the last layer is still melted, you press a stamp into it. It gives a great effect, and it really does look like metal!
I used one of the stamps from "Priceless" stamp set for mine, and punched it out with a circle punch. I then layered it on a larger circle (1 3/8") and then the scallop circle. Here's a close-up:

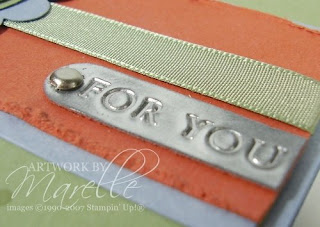
Marelle Taylor Stampin' Up! AustraliaThen I made a 'metal' tag by pressing a stamp from "Basic Phrases" into molten embossing powder, and then punching it out with the Word Window punch, and embellishing it with a silver brad. Here's another close-up:

Marelle Taylor Stampin' Up! AustraliaStamps: Priceless, Basic Phrases, Polka dot background
Cardstock: Mellow Moss, Bordering Blue, Really Rust
Other: Cutter Kit, Scallop Circle Punch, 1 3/8" Circle punch 1 1/4" circle punch, Word Window Punch, Mellow Moss Taffeta Ribbon, Silver brads


Sunday, August 10, 2008

Belated Blog Awards

I'm so hopeless at this Blog-award and Blog Tagging stuff.... I've been nominated a few times lately, and I've been very slack about putting it up here *blush*I have been nominated for the Brilliante Blog award by Sue, Kirrily, Nikki, Michelle, and Tegan
and the 'Arte y pico' award by Carol
I was also tagged by Stacey and asked to name 7 random facts about myself. Well, I can name one: I'm hopeless at keeping up to date with Blog awards! LOL
Thankyou ladies! I know I'm supposed to nominate some other blogs for these, but I'm going to be a party-pooper and just say Thanks for thinking of me!


Saturday, August 09, 2008

Cracked Glass

I had intended to show you the third card we made at my "Cards with a Difference" class, but I mustn't have taken a pic of it, so that will have to wait. I had actually intended to show you yesterday, but blogging just didn't happen yesterday. Neither did doing Kristina's latest Colour Challenge :o(
Anyone know how to insert an extra day in the week??

This is one of the cards we made in July's "Embossing and More" class:

Marelle Taylor Stampin' Up! AustraliaWe did the Cracked Glass technique on this one. It's a great effect, and isn't hard at all (when you know how!). First I stamped the Oak Tree image (from 'Lovely as a Tree'); I inked up the image in Creamy Caramel as a base coat, and then coloured the trunk with a Chocolate Chip marker, and 'thumped' More Mustard and Really Rust markers over the top part of the tree. Thumping is a great way to create a multicoloured effect on a bold stamp. All you do is hold your marker like a drum stick and tap the ink onto your stamp. I also watercoloured the trunk, just to fill it out a little.
Now for the fun part: layers of embossing powder. Start by inking Versamark over the whole piece of cardstock. Then, sprinkle with clear embossing powder and tip off the excess. Heat with your Embossing Tool. While the powder is still hot and melted, cover with another layer of powder, and tip off the excess (you'll need to be quick!). Then re-heat. Repeat until you have about 5 layers of embossing powder. It should look shiny and glass-like. Pop it in the freezer for 10-20 minutes. Pull it out and start cracking it immediately. I sponged some Chocolate Chip ink over the cracks to accentuate them.
The rest of the card is really easy...just some tone-on-tone background stamping and a piece of Hodgepodge Hardware as a finishing touch. This would make a great masculine card, although you might want to change the greeting to something more butch....we do have a "No worries Mate!" stamp ;o)

Cardstock: Close to Cocoa, More Mustard, Really Rust, Chocolate Chip, Very Vanilla
Ink: Creamy Caramel, More Mustard, Really Rust, Chocolate Chip
Stamps: Lovely as a Tree, En Francais, Occasional Greetings
Other: Aged Copper Hodgepodge Hardware

Have a great weekend!

Wednesday, August 06, 2008

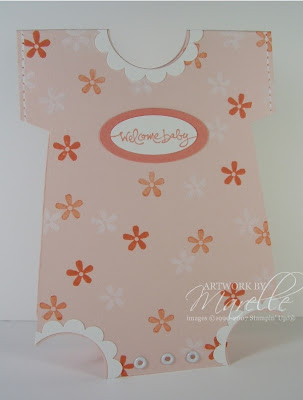
Baby Jumpsuit card

Just a quick one today. I have 4 classes and 3 workshops this week, so I don't have much free time on my hands! This is one of the other "cards with a difference" we made last month. You've probably seen these around the place. On US blogs they're called "onesie" cards, but I named it a baby jumpsuit, since we don't use the word "onesie" here. You can see an online tutorial HERE.

Marelle Taylor Stampin' Up! AustraliaThey are so quick and easy to make, and they would make really cute birth announcements or Baby Shower invitations.
I made mine from Blush Blossom cardstock, stamped in Groovy Guava and Whisper White ink (using the cute stamps from 'Little Pieces'). In the class everyone got to choose the colour of their baby jumpsuit.
I used the cute "welcome baby" sentiment from 'Short and Sweet', punched out with the small oval punch, and mounted on a Large Groovy Guava Oval. The eyelets, scallop trims and faux stitching on the sleeves add the perfect finishing touches.

Monday, August 04, 2008

Big Buckle Card

I thought I'd keep showing you some of the class creations we made last month. My Thursday project class was called "Cards with a Difference", and we made 3 cards that are different from just your usual run-of-the-mill A5 card. This one is a Big Buckle card.

Marelle Taylor Stampin' Up! AustraliaStamps: Bud Basics, It's All Good, Priceless
Colours: Ruby Red, Groovy Guava, River Rock, Wild Wasabi
We used quite a few punches on this one: 1 1/4" Square, 1 3/8" Square, Word Window, Corner Rounder.
To stamp the Bud Basics background panel, I stamped the outlines full-strength, but the solid stamps have been stamped-off onto scrap card stock first, before stamping onto my card. I used the swirl from Priceless to fill in some of the gaps, and to incorporate some River Rock in there.

You can see some instructions for making the Big Buckle card HERE. I adapted them to suit our cardstock.


Friday, August 01, 2008

July Stamp-a-Stack Design #2

Woo Hoo! the Spring Mini Catalogue is LIVE today. You can view it HERE. Let me know if there's anything you would like, and I can order it for you today. I can have orders shipped anywhere in Australia for just $5.95 or 5% of the order total, whichever is greater.

Marelle Taylor Stampin' Up! AustraliaThis was the other design that everyone made during July. This one took a little bit longer, because there was a bit of watercolouring involved. We stamped the images from "A Little Bit of happiness" (level 1 Hostess set) onto Naturals Ivory cardstock. This is the most fine-lined stamp set I have ever used. It's just a dream to stamp with...so crisp and clear! We stamped in Black Stazon (THE best ink to use when you are watercolouring) and then did a light colour wash using an Aquapainter and Sahara Sand ink. This just "fills in" the images a bit and gives them more depth. Then we stamped an extra image for each set onto scrap Naturals Ivory cardstock and cut it out to act as a spotlight. Again we coloured using inkpads and an Aquapainter, but this time in vibrant colour. The spotlights have been popped up on dimensionals.
I'm not sure if you can tell from the photo, but each base card has been jumbo-wheeled using the Rough Texture wheel and Versamark ink. This just takes away from the plain-ness of the cardstock, without detracting from the focal image. Instead of wheeling in straight lines, we just ran the wheel backwards and forwards repeatedly in all directions...great stress relief ;o)
The sentiments are from "So Many Sayings" (another Level 1 Hostess set). There really are so many sayings in this set! I've punched them out using the Word Window Punch. The other little details on the cards are the 'lines' linking the sentiments to the card. It's such a simple thing to add, but it grounds the Word Windows, and provides a link to the rest of the card. Each one has been done differently. I have Paper pierced one; on another I have used the paper piercer as a grid to draw dots with the fine tip of my marker; I have scored a line on one with a bone folder; and on the fourth I have drawn a dashed line, using a ruler and the fine tip of my marker. So, there you go, 4 different (and simple!) ideas for adding lines to your cards.

Colours: More Mustard, Blue Bayou, Really Rust, Groovy Guava, Close to Cocoa, Wild Wasabi


LinkWithin

Blog Widget by LinkWithin